
Member Login / Registration widget
The Member Login / Registration widget allows visitors to log in to an existing account or register as a new member directly on your site.
It is commonly used for memberships, gated content, client portals, online programs, communities, and any experience that requires user accounts.
The widget combines login, registration, member creation, and CRM data collection into a single, configurable component that can be fully styled to match your brand.
What the Widget Is Used For
Use the Member Login / Registration widget when you want to:
- Allow users to log in to protected areas
- Enable new users to register as members
- Collect structured user data during signup
- Assign members to groups automatically
- Connect registrations to email marketing and automations
- Control post-login and post-registration redirects
Common use cases include:
- Membership sites and portals
- Online courses and programs
- Client dashboards
- Communities
- Lead-based registrations with gated content
Login & Registration Visibility
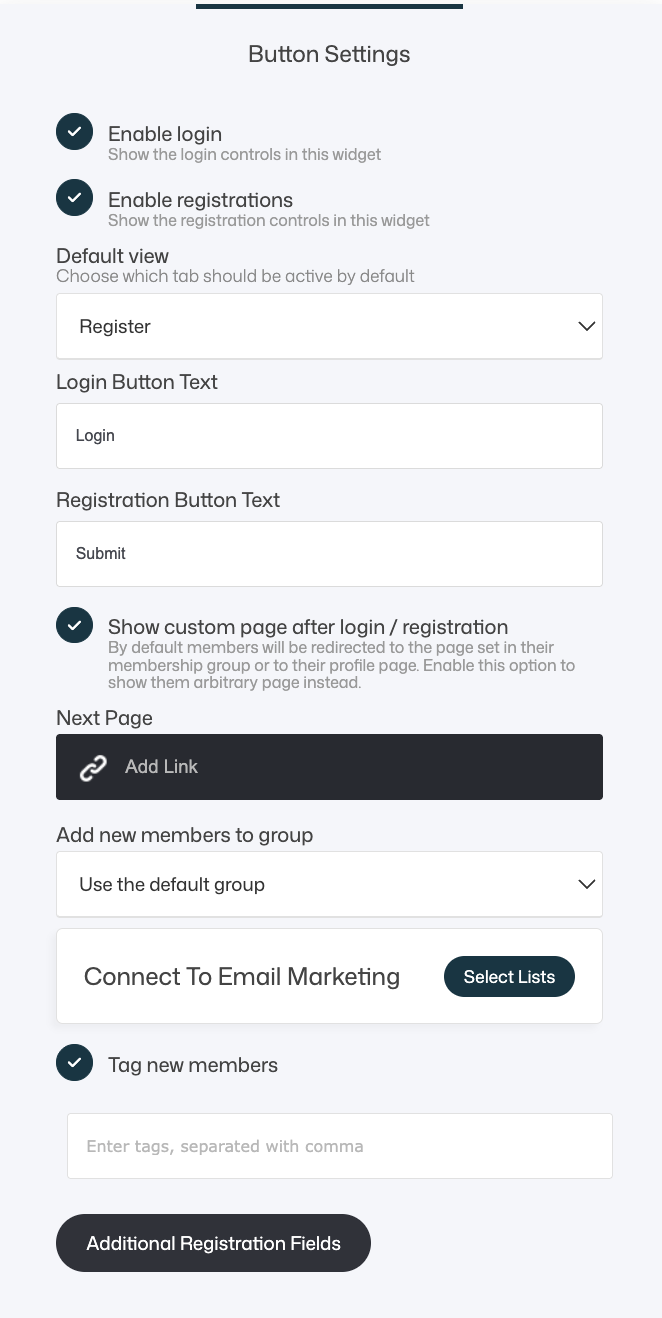
Enable Login
When enabled:
- Displays login controls (email + password)
- Allows existing members to access their accounts
Disable this if:
- You only want new registrations
- The widget is used purely for onboarding
Enable Registration
When enabled:
- Displays the registration form
- Allows new users to create an account
Disable this if:
- Registrations should be closed
- Users must be added manually or via other flows
💡 Best practice
For most public membership pages, enable both login and registration to reduce friction.
Default View
Default View
Choose which tab is active when the widget loads:
- Login
- Register
💡 Important clarification
If both Login and Registration are enabled, users can always switch between Login and Register using the tabs—regardless of which option is selected as the default view.
The default view only controls what is shown first, not what is available.
Use Login when:
- Most visitors already have accounts
- The page is primarily for returning members
Use Register when:
- The page is focused on onboarding
- You’re driving traffic to sign up (campaigns, launches)
Button Text Customization
Login Button Text
Controls the label on the login button
Examples:
- Login
- Sign in
- Access account
Registration Button Text
Controls the label on the registration submit button
Examples:
- Register
- Create account
- Get access
- Join now
💡 Tip
Use action-oriented copy for registration to improve conversions.
Redirect After Login / Registration
This section controls where members are sent after logging in or completing registration.
Default Redirect Behavior
By default, members are redirected based on their membership group setup:
- If a member belongs to one membership group with a redirect URL defined, they are sent directly to that page.
- If a member belongs to two or more membership groups that each have a redirect URL defined, they are redirected to their member profile page so they can choose which content to access.
This ensures a predictable and conflict-free experience when multiple memberships exist.
Show Custom Page After Login / Registration
When enabled, this option overrides the default group-based behavior and allows you to define a specific destination page for this widget.
Use this when you want:
- A controlled onboarding flow
- Different login pages for different audiences
- Campaign- or offer-specific redirects
Next Page
Select the page users should land on after login or registration. Common use cases include:
- Welcome or onboarding pages
- Member dashboards
- Getting-started steps
- Thank-you or confirmation pages
💡 Tip: Separate login flows
If you want different redirects for different member groups, you can use multiple Login / Registration widgets on separate pages and configure a unique Next Page for each one. This gives you full control without relying on membership group redirects.
Member Group Assignment
Add New Members to Group
Controls which group new members are assigned to:
- Use the default Member group
- Select a specific Member group
Why this matters:
- Groups control access
- Groups can trigger automations
- Groups help segment members
💡 Tip
Use different widgets or pages to assign users to different groups automatically.
Email Marketing Integration
Allows you to:
- Add new members to selected email lists
- Trigger email automations
- Sync contacts with your email system
Typical uses:
- Welcome email sequences
- Onboarding campaigns
- Member-only newsletters
Tag New Members
When enabled:
- Automatically applies one or more tags to new members
Tags are useful for:
- Segmentation
- Automation triggers
- Tracking signup sources
💡 Best practice
Use tags to distinguish where and how users registered (e.g. “webinar-signup”, “free-trial”, “paid-member”).
Additional Registration Fields (Very Important)
Additional Registration Fields
This option lets you extend the registration form with custom fields.
When clicked, you can:
- Select existing CRM properties
- Create new properties
- Add sections or hidden fields
CRM Properties
These are predefined data fields stored in each member’s profile, such as:
- First name / Last name
- Phone
- Address
- City, Country, ZIP
- Company name
- Website
- Custom descriptions
- Checkboxes (e.g. accept terms)
You can also:
- Create new custom properties
- Reuse properties across forms and widgets
Common Fields
Additional layout elements include:
- Section – visual separators for grouping fields
- Hidden – collect data silently (UTMs, campaign identifiers, internal flags)
💡 Best practices
- Only ask for what you truly need
- Keep registration forms short to reduce drop-off
- Collect additional details later inside the member area if possible
- Use sections to improve readability when many fields are required
Form Styling
Labels and Fields
Controls how labels and input fields look:
- Label color
- Field background color
- Field text color
- Field border color
- Font size
- Font family
- Border radius
💡 UX tip
Ensure sufficient contrast for accessibility and readability.
Button Styling
Controls the appearance of the login and registration buttons:
- Button background color
- Border color
- Gradient toggle
- Text style (font, size, spacing, weight)
- Shadow
- Padding size
- Border radius
- Border size
- Full-width button toggle
- Button alignment (left, center, right)
- Hover effect
💡 Best practice
- Use one primary button color consistently across your site
- Full-width buttons work especially well on mobile
- Subtle hover effects improve perceived quality
Text Style (Buttons)
Customize button text appearance:
- Text color
- Font family
- Font size
- Letter spacing
- Font style (bold, italic, underline)
💡 Tip
Keep button text legible and avoid overly small font sizes.
UX & Conversion Tips
- Keep registration friction low
- Default to Register view on acquisition pages
- Use clear, benefit-driven button text
- Redirect new users to a guided onboarding page
- Assign groups and tags intentionally
- Style forms to match your brand
- Test both desktop and mobile experiences
Summary
The Member Login / Registration widget allows you to:
- Handle login and registration in one place
- Control default views and redirects
- Assign members to groups automatically
- Collect structured CRM data during signup
- Connect members to email marketing and automations
- Fully customize form and button styling
Used thoughtfully, this widget becomes a powerful entry point into your membership, onboarding, and customer journey—balancing ease of use with deep control over data, access, and experience.