
How to Create and Manage Membership Products
Membership Products are designed for selling access, continuity, and transformation – by unlocking content and experiences behind login. They allow you to build scalable offers where value is delivered through gated content, structured programs, communities, and ongoing engagement rather than one-time downloads or manual fulfillment.
With Membership Products in Recrevio, customers purchase access that automatically unlocks specific content areas. Most commonly, this means access to a Circle, but memberships can also grant access to regular pages, funnel steps, or other protected areas across your platform. This makes memberships ideal for building long-term value, recurring revenue, and deeper relationships with your audience.
Membership Products are ideal for offering:
- Online courses and learning programs
- Membership sites and subscriptions
- Communities and Circles
- Cohort-based programs
- Ongoing education or resource libraries
- Challenges, programs, and portals with gated content
Membership Products focus on structured access control rather than file delivery or manual service fulfillment. Once purchased, access is handled automatically based on your setup – creating a smooth, scalable experience for both you and your members.
This article walks through every section of the Membership Product editor, from top to bottom, explaining each setting and offering best-practice recommendations so you can confidently create, price, and manage membership-based offers that grow with your business.
Creating a Membership Product
To create a Membership Product:
- Go to Products → All Products
- Click Add Product
- Select Membership as the product type
This opens the product editor, which is divided into three main areas:
- Main product details (left column)
- Product settings & media (right column)
- Advanced product options (sections below)
1. Main Product Area (Top Left)
This is where you define the core information about your product.
Product Title
Enter the name of your product as it will appear:
- In your store
- On checkout pages
- In order confirmations
- In emails and receipts
💡 Tip – Product Names for Membership Products
Use clear, value-driven names that communicate the ongoing benefit, transformation, or experience members will get—not the internal structure of the membership. Focus on what the member gains access to and why it matters over time.
For example:
Use “Creator Growth Membership” instead of “Monthly Content Portal v1”
Use “Leadership Circle” instead of “Member Area – Level 2”
If your membership includes multiple elements (courses, community, live sessions, resources, or programs), keep the product title simple and aspirational, and explain the full scope, access rules, and structure in the product description or funnel instead – rather than trying to list everything in the product name.
Description
The description will be displayed in the built-in store. You can describe your product using either:
-
Simple Editor – clean text-based description
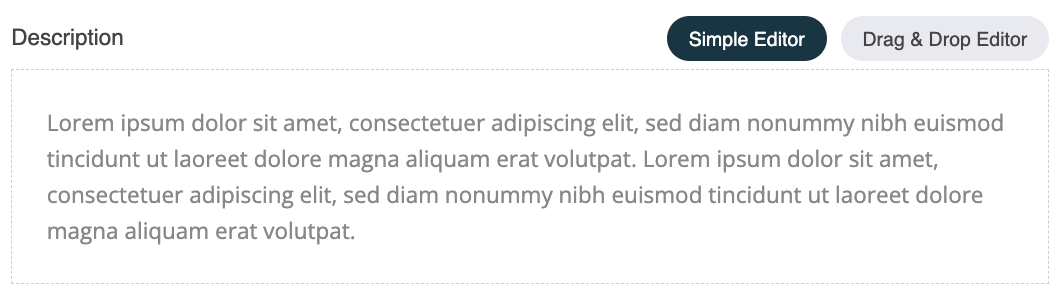
-
Drag & Drop Editor – opens the web studio controls so you can add any widget – this enables richer layouts with sections, images, and formatting. Simply click the Add Widget button to open the widget panel to the left and drag and drop any widget to the discription field.
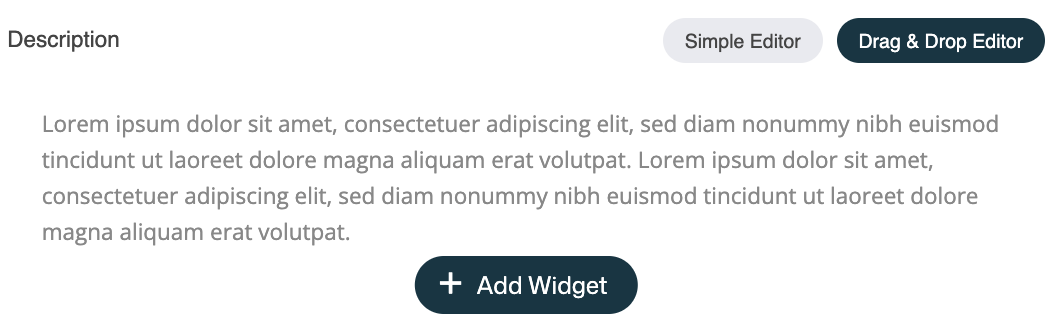


Use the description to explain:
- What the product is
- Who it’s for
- What’s included
- Key benefits or features
💡 Tip – Use the AI Writing Assistant for Product Descriptions
You can use the built-in AI Writing Assistant to quickly create or improve your product description.

Generate a description from the product title, expand or shorten existing text, or refine the wording to make it clearer and more compelling.
This is especially helpful if:
- You want a quick starting point
- You need help structuring your copy
- You want to improve clarity or tone
👉 See separate article: Using the AI Writing Assistant
Price

Set the base price of the product.
Available options:
- Standard Price – Sets the regular price for the product.
- On Sale – Display the original price as strikethrough in checkouts, highlighting a discounted sale price.
- Subscription Product – Enables recurring payments by charging customers on a repeating schedule.
Subscription Product
If enabled, the product becomes a recurring or installment-based product.

You can chose:
- Billing cycles
-
Ongoing Payments
Charges continue indefinitely until canceled, e.g. charging every month for monthly plans and every 12 months for annual plans.
-
Installments
Chose a fixed number of payments (2–52 installments)
-
-
Charge every
Chose the payment frequency to every 1–12 weeks or 1–12 months
💡 Tip – Subscriptions & Installments for Membership Products
Membership Products are designed for ongoing access to content, programs, and community, which makes subscriptions the most common choice—but installment payments can also be useful in specific scenarios.
Use subscriptions when:
- The membership provides continuous access or ongoing value
- New content, sessions, or resources are released regularly
- You’re building a long-term relationship with members
Examples:
- Monthly or annual memberships
- Communities with ongoing discussions and live sessions
- Content libraries with regular updates
- Ongoing access to Circles, programs, or resources
Use installments when:
- The membership represents a structured program or course
- Access is tied to a defined timeframe or outcome
- You want to reduce the upfront cost of a higher-priced offer
Examples:
- Cohort-based programs
- Time-limited courses or certifications
- Programs that run over several weeks or months
💡 Best practice
Use subscriptions for memberships and communities with ongoing value and no fixed end date. Use installments for programs or courses with a clear start, structure, and completion point. This ensures your pricing matches the delivery model and sets clear expectations for members.
SKU (Stock Keeping Unit)
An optional internal identifier for:
- Inventory management
- Accounting
- Fulfillment systems
💡 Tip – SKU for Membership Products
SKUs are optional for membership products and often not required, since there is no physical inventory or fulfillment involved. You can safely leave the SKU field empty for most membership products.
Product Type
This is pre-set to the product type chosen when creating the product. The product type determines which fields are shown. Once the product has been created this canät be changed.
Available options:
- Physical product
- Digital product
- Service
- Membership
Member Groups (Access Control)
Membership products grant access by automatically adding customers to one or more Member Groups after a successful purchase.
When a customer checks out:
- They are asked to log in or create an account
- Once payment is completed, they are added to the selected member group(s)
- Access to gated content (Circles, pages, programs, or funnels) is granted based on those group permissions
This makes Member Groups the foundation for access control in membership products.
Selecting Member Groups:
- Click Select to choose which member group(s) the customer should be added to
- You can assign one or multiple groups depending on the level of access you want to provide
- Member Groups can be reused across multiple membership products
💡 Important
If you haven’t created any Member Groups yet, you’ll need to do that first.
You can create and manage Member Groups under:
Contacts > All Contacts & Members
👉 See separate article: Managing Member Groups
Member Groups allow you to:
- Control access to content behind login
- Structure different membership tiers
- Manage permissions across Circles, pages, and programs
- Automate onboarding and offboarding based on purchases
Using Member Groups correctly ensures a secure, scalable, and flexible membership setup.
2. Right Column – Media & Visibility Settings
This column controls how your product looks and behaves externally.
Product Images
Add one or more images to visually represent your product.
Images are used in:
- Store listings
- Product pages
- Checkouts
- Emails and receipts
Product Categorization
Assign the product to one or more categories or subcategories. You can also create and assign new categories during the product creation process by clicking the + icon in the Select Product Categories popup:

Categories help:
- Organize your store
- Improve navigation
- Enable filtering
💡 Note
Products are assigned to categories individually (not in bulk).
Hidden Product
When enabled:
- The product is hidden from the store
- Still usable in direct links, funnels, as upsells/downsells or automations using the checkout widget
💡 Use case
Private offers, upsells, or invite-only products.
Product Page URL
Defines the URL slug for the product page.
Example:
/product/product-name
💡 Tip: Keep URLs short, readable, and keyword-friendly.
SEO Settings
Control:
- Page title
- Meta description
💡 Tip – Use the AI Writing Assistant for SEO Title & Description
You can use the built-in AI Writing Assistant to quickly create or refine your SEO Title and SEO Description.
Click Generate via AI to automatically generate an optimized SEO title and SEO description based on your product page (in this case basically the Product name and Product description).
You can also use the AI controls to:
- Improve existing text
- Expand or shorten your SEO copy
- Fine-tune wording for clarity, tone, and search visibility
This is especially helpful if:
- You want SEO-friendly text without starting from scratch
- You need help fitting within recommended character limits
- You want clearer, more compelling search snippets
👉 See separate article: Using the AI Writing Assistant
3. Advanced Product Options (Below Main Area)
These sections add deeper functionality to your product.
Track Inventory
Enable this to:
- Track available quantity
- Show remaining stock
- Get notified when inventory runs low
💡 Tip
Leave inventory tracking disabled for most Membership Products unless you intentionally want to limit access or availability.
Custom Thank You Page
Optionally redirect customers to a custom page after purchase.

Use this for:
- Post-purchase instructions
- Upsells
- Onboarding steps
- Delivery expectations
Additional Questions
Ask customers for extra information before adding to cart.
Examples:
- Gift message
- Custom notes
💡 Tip
Keep questions minimal to avoid friction during checkout.
Tag Customers
Automatically apply tags to customers after purchase.

Tags can be used in:
- Automations
- Email segmentation
- CRM filtering
💡 Example
Tag customers with membership-product-buyer .
Saving Your Product
When all settings are complete:
- Click Save Changes
- The product becomes available based on its visibility settings
Best Practices for Membership Products
Use clear, value-driven membership names
Focus on the ongoing value, transformation, or experience members receive (e.g. “Founders Growth Circle” instead of “Membership Tier B”).
Write a compelling and confidence-building description
Clearly explain:
- What members get access to
- What type of content or experience is included (courses, community, live sessions, resources)
- How often new content or activities are delivered
- Who the membership is for
- What outcome, progress, or support members can expect over time
Set expectations for access and engagement
Be clear about:
- Whether access is ongoing or time-limited
- How long content remains available
- If live sessions, replays, or community access are included
Clear expectations reduce churn and improve long-term retention.
Use visuals to communicate the experience
Add images that help members understand and trust the offer, such as:
- Community or program branding
- Screenshots or previews of content
- Visuals representing the journey, structure, or transformation
Choose the right pricing model
- Use subscriptions for ongoing memberships, communities, or continuously updated programs
- Use installments for fixed-length courses or programs with a clear start and end
- Use one-time pricing only for time-limited access or lifetime-style courses
Structure access with Member Groups
Use Member Groups to:
- Control what content members can access
- Create multiple tiers or levels
- Easily upgrade, downgrade, or revoke access through automations
Use a custom Thank You page for onboarding
Guide new members immediately after purchase with:
- Login instructions
- Where to start inside the membership
- Links to key areas (Circle, first lesson, welcome post)
- Next steps or onboarding actions
Test the full member journey before launch
Before going live:
- Complete a test purchase
- Confirm member group access is applied correctly
- Verify login, content access, and emails
- Review the onboarding and first-time experience
💡 Tip
Membership products succeed when the experience feels intentional, welcoming, and valuable over time. Clear positioning, structured access, and thoughtful onboarding are key to retention and long-term recurring revenue.