
Configure the General Store Settings (Sales Settings)
The General tab contains global settings that define how your e-commerce store behaves across pricing, checkout flow, inventory handling, and order logic.
These settings apply to your entire store and affect how customers see prices, how orders are processed, and how your internal systems track activity.
Setting these values correctly is essential for accurate pricing, smooth checkout experiences, and reliable order management.
Where to Find General Settings
Navigate to Sales & Analytics > Sales Settings > General
This opens the General Store Settings panel for your store.
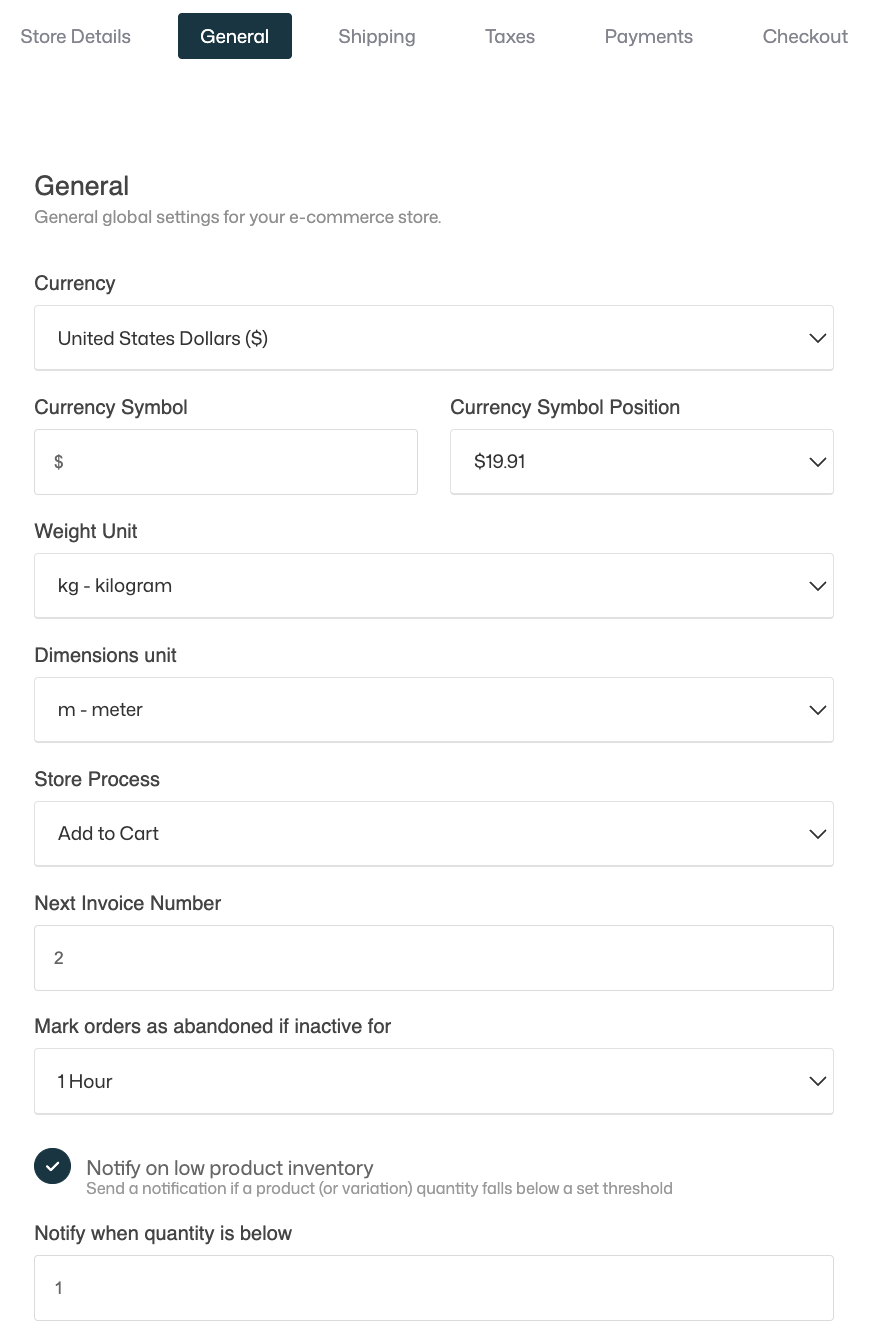
General Settings Overview
The General section contains the core configuration settings that define how your store operates at a fundamental level.
These settings control how prices are displayed, how customers move through checkout, how inventory is tracked, and how orders and invoices are generated.
Because these options apply globally across your store, it’s important to review them carefully—especially before you start selling. Changes made here affect all products, subscriptions, orders, analytics, and customer-facing checkout experiences.
In this section, you configure:
- Store currency and price formatting
- Measurement units for products and shipping
- Customer purchase flow (checkout behavior)
- Invoice numbering and abandoned cart tracking
- Inventory notifications and stock thresholds
Below, each setting is explained in detail, including available options, how they work, and best-practice recommendations.
Currency
Select the main currency used in your store.
This currency is used for:
- Product prices
- Subscriptions
- Orders and invoices
- Revenue reporting and analytics
Recrevio supports a wide range of commonly used global currencies.
💡 Recommendation
Choose the currency that matches where you primarily sell or where your business is registered. Changing currency later may affect reporting consistency and historical analytics.
Currency Symbol
Defines the symbol shown alongside prices (for example $ , € , £ , kr ).
This field is text-based and can be customized if needed.
When this is useful
- If you want a local representation (for example
krinstead ofSEK) - If you want a branded or stylized currency symbol
Currency Symbol Position
Controls where the currency symbol appears relative to the price.
Available options include:
- Before the amount (e.g.
$19.99) - After the amount (e.g.
19.99 kr)
💡 Tip
Choose the format that aligns with customer expectations in your target market to reduce friction and confusion at checkout.
Weight Unit
Defines which unit is used for product weight.
Available options include:
- Kilogram (kg)
- Pound (lb)
- Ounce (oz)
This setting is used when:
- Defining product weights
- Calculating shipping (if weight-based shipping is enabled)
- Integrating with shipping providers or external tools
💡 Recommendation
Use the unit most commonly used in your shipping region to avoid conversion errors and misunderstandings.
Dimensions Unit
Defines which unit is used for product dimensions.
Available options include:
- Meter (m)
- Foot (ft)
- Inches (in)
This ensures consistency when:
- Working with physical products
- Configuring shipping rules
- Integrating with fulfillment or logistics systems
Store Process
Controls how customers move through the purchase flow.
Available options:
- Add to Cart – Customers can add multiple items before proceeding to checkout
- Buy Now – Customers are sent directly to checkout from the product
💡 Tip
When to use what:
- Add to Cart is ideal for stores selling multiple products, bundles, or physical goods
- Buy Now works best for single-offer funnels, digital products, memberships, or focused campaigns
Next Invoice Number
Defines the next invoice number that will be used when a new order is created.
This is especially useful when:
- Migrating from another system
- Keeping invoice numbering continuous
- Ensuring accounting and legal compliance
💡 Tip
Make sure this number does not overlap with existing invoices from previous systems.
Mark Orders as Abandoned If Inactive For
Controls when an incomplete checkout is considered abandoned.
Available options range from:
- 15 minutes
- 30 minutes
- 1 hour
- 2 hours
- 3 hours
- 6 hours
- 10 hours
- 24 hours
- 48 hours
- Do not track abandoned carts
This setting affects:
- Abandoned cart tracking
- Recovery automations
- Analytics related to checkout behavior
💡 Recommendation
Choose a timeframe that matches your typical buying cycle:
- Shorter times work well for impulse purchases
- Longer times suit high-consideration or higher-priced offers
Notify on Low Product Inventory
When enabled, you’ll receive notifications when product inventory drops below a defined threshold.
This helps you:
- Prevent overselling
- Restock in time
- Manage limited or physical inventory more effectively
Notify When Quantity Is Below
Defines the exact inventory level that triggers the low-stock notification.
This is especially useful for:
- Physical products
- Limited stock offers
- Time-sensitive launches or campaigns
💡 Tip
Set the threshold slightly above zero to give yourself time to react before products sell out.
Saving Your Changes
At the bottom of the page:
- Click Save Changes to apply updates
- Click Discard to cancel and keep existing settings
Changes take effect immediately and apply across your entire store.
Recommended setup checklist
Before moving on, make sure you’ve:
- Selected the correct primary currency for your store
- Verified that the currency symbol and symbol position match your market expectations
- Chosen appropriate weight and dimension units for your products
- Set the preferred store process (Add to Cart or Buy Now)
- Confirmed the next invoice number does not conflict with existing invoices
- Configured how long inactive checkouts are tracked as abandoned carts
- Enabled low inventory notifications if you sell physical or limited-stock products
General settings define how prices, products, checkout flow, and inventory behave across your entire store. Getting these settings right early ensures consistent pricing, accurate reporting, and a smoother customer experience.
Next Step in your Sales Settings Setup
Next up: Add Shipping Options, where you define delivery options, shipping rules, and customer-facing shipping behavior – if you sell physical products that require shipping.
If you only sell digital products or services that don't require shipping, please skip to Add Tax Options